ArduinoDriven LED Traffic Light Arduino Project Hub
Simulasi Arduino UNO kontrol 8 lampu ledProgram: https://drive.google.com/file/d/1v3lA9HGm_ZKbWllzIESOyHzAqEaHMcT5/view?usp=sharing
How to blink an LED with Arduino Ardumotive Arduino Greek Playground
Blinking an LED. Blinking an LED is an introductory Arduino project in which we control an LED using Arduino. LED blinking refers to the process of continuously turning an LED (Light Emitting Diode) and off in a repetitive pattern. It is a simple and common demonstration in electronics and microcontroller-based projects.

Mengatur Kecerahan LED dengan Potensio di Arduino BoArduino
Dalam Sketch Program Menyalakan LED Menggunakan Arduino UNO ada beberapa cara Sketch Program untuk dapat menyalakan LED nya, berikut ini saya akan paparkan cara Menyalakan LED dengan Aktif HIGH. Sketch Program Cara Pertama : // Menyalakan LED Menggunakan Arduino UNO. // Menyalakan LED dengan Aktif HIGH. void setup()

Arduino Dasar ( Coding Lampu LED ) YouTube
For RGB LED with common Anode, you need to: Connect the common pin to 3.3V of Arduino. Change R, G and B values in analogWrite () function to 255 - R, 255 - G, and 255 - B, respectively. A sequences of RCB LED connected together creates the RGB LED Strip. LED strip can be categorized in to the addressable LED strip and non-addressable LED Strip.

Simulasi Arduino Lampu Berkedip dengan Enam LED YouTube
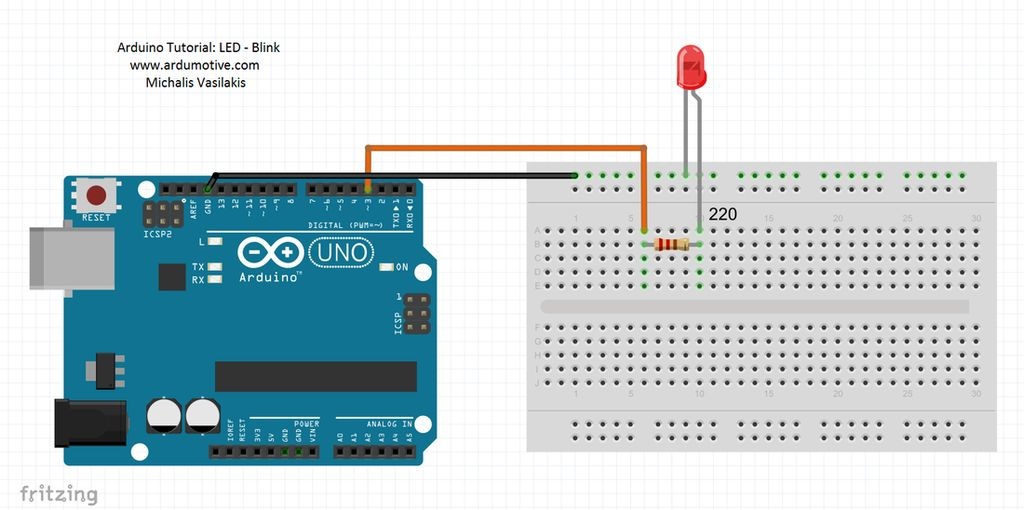
Build the circuit. Here is the circuit. How to build the circuit: First make sure that the Arduino is powered off (no USB cable plugged to anything). Check the LED, you will see that one of the leg is shorter than the other one. Plug the shorter leg of the LED to a hole on the breadboard.

BELAJAR CODING ARDUINO DARI DASAR (MEMPROGRAM LED) PART 1 YouTube
Bismillahirrahmanirrahim. Assalamu'alaikum warahmatullahi wabarakatuh. Pada pertemuan sebelumnya telah saya jelaskan cara Menyalakan LED Menggunakan Arduino UNO dan kali ini saya akan membuat Project selanjutnya yaitu LED Berkedip atau Blink LED Menggunakan Arduino UNO.. Project ini saya menggunakan pin 4 pada Arduino UNO untuk menyalakan sebuah LED Berkedip atau Blink LED, serta saya akan.
arduino blink led circuit Arduino uno
Select the Classic Bluetooth or BLE according to the module you used. Pair the Bluetooth App with HC-05 Bluetooth module or HM-10 BLE module. Type "ON" or "OFF" and click Send button. See the LED's state on Arduino board. We will see LED's state is ON or OFF, respectively. We also see LED's state on Bluetooth App.
Seri Belajar Arduino Blinking LED (Mengedipkan LED) Universitas Internasional Semen Indonesia
Yaitu sketch khusus blink. Caranya dengan memilih menu File > Example > Basic > Blink. Atau kamu juga bisa mengetikkan langsung contoh program Arduino LED berkedipdi bawah ini pada Arduino IDE. digitalWrite berfungsi untuk mengatur apakah pin 13 akan dibuat HIGH (lampu menyala) atau LOW (lampu LED mati).

Membuat Lampu Led Berjalan Menggunakan Arduino Uno Seputar Jalan
This tutorial teaches you to control LED using Arduino UNO or Genuino UNO. It can apply to control ON/OFF any devices/machines. The detail instruction, code, wiring diagram, video tutorial, line-by-line code explanation are provided to help you quickly get started with Arduino.
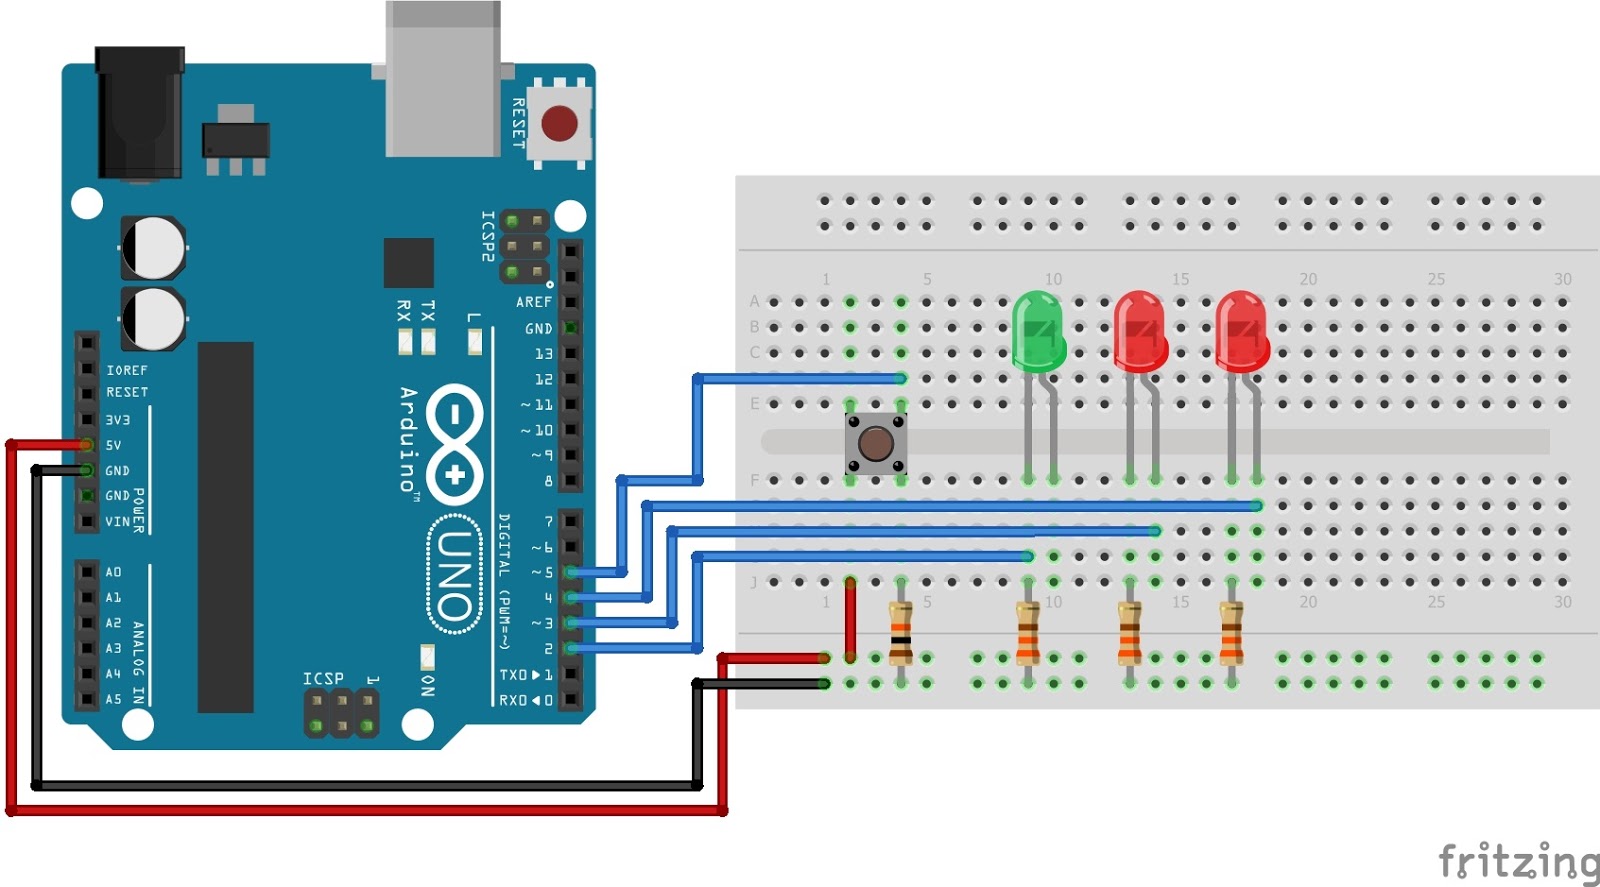
Arduino Tutorial Digital Input Output Arduino [LED dan Push Button] MUHILHAM • Electronics
1 /*Code to control an LED via bluetooth through a phone app. 2 Project by MukeshArvindh. Code by MukeshArvindh.*/ 3 4 /*If you are going to copy and paste the code, then do not forget 5 to delete the void setup() and void loop() function from the 6 sketch you are using before doing so,as the functions already 7 exist in this sketch. Copy-pasting the comments will not 8 cause any changes in.

Tutorial Arduino 4 Menyalakan LED dengan Sensor Cahaya LDR YouTube
Demikianlah tutorial Mengontrol LED dengan Ultrasonic di Arduino. Melalui tutorial ini, kamu telah mempelajari cara menggunakan sensor ultrasonik untuk mengukur jarak dan mengontrol LED pada board Arduino. Dalam hal ini, kamu telah menggunakan kode program sederhana yang dapat dengan mudah dipahami bahkan oleh pemula.

Arduino Tutorial LED Blink example YouTube
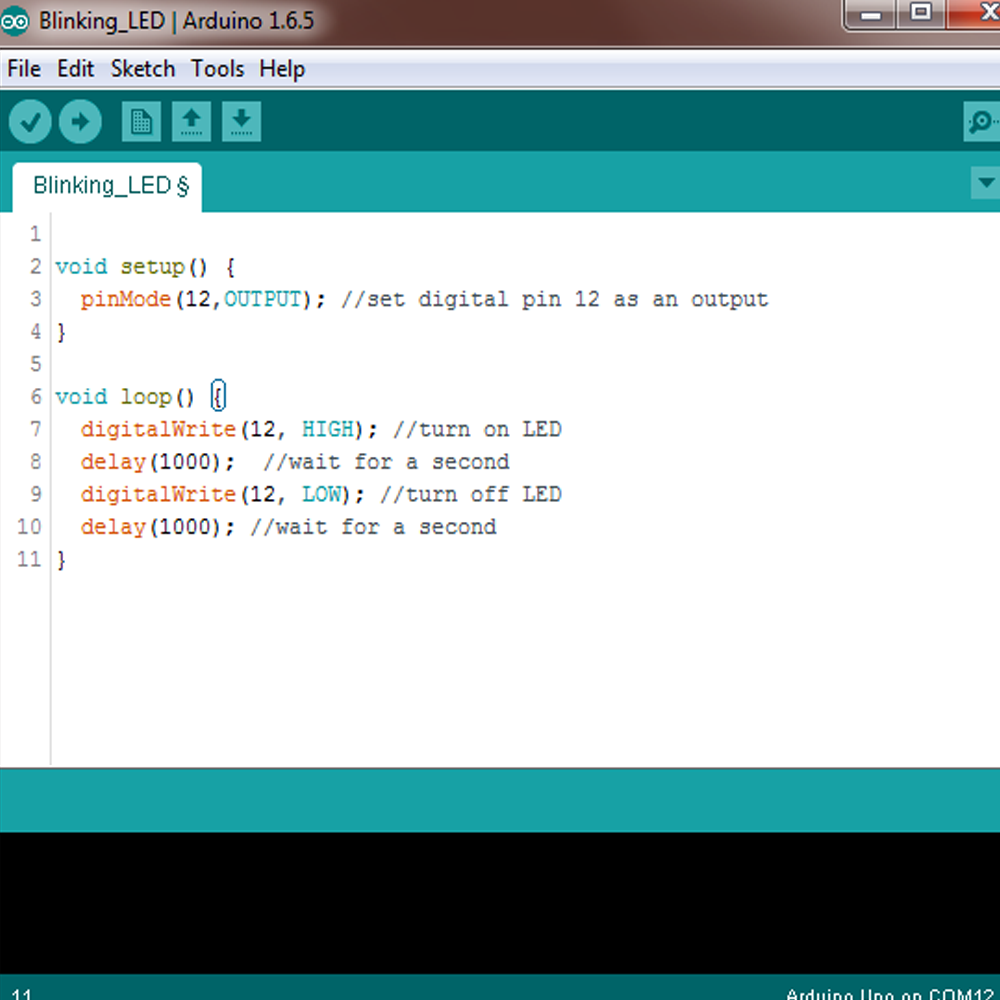
Code to make the LED flash on/off: After the microcontroller board is plugged into the computer and the LED is on the board itself, we need to write some simple code to make the LED blink. // the setup function runs once when you press reset or power the board. void setup() {. // initialize digital pin LED_BUILTIN as an output.

Simulasi rangkaian Blinking LED menggunakan Arduino UNO *Input dan Output YouTube
Sebelum saya memulai Project Lampu LED Berjalan Menggunakan Arduino UNO, saya mengucapkan selamat Hari Raya Idul Adha 1437 H, yang jatuh pada tanggal 12 September 2016 atau 1 Dzulhijjah. Saya berharap dengan berqurban, umat muslim bisa lebih diajarkan saling berbagi kepada umat yang kurang mampu serta keikhlasan hati, dan di jauhkan dari sifat.
Arduino LED Blinking Tutorial 2 MakerStream
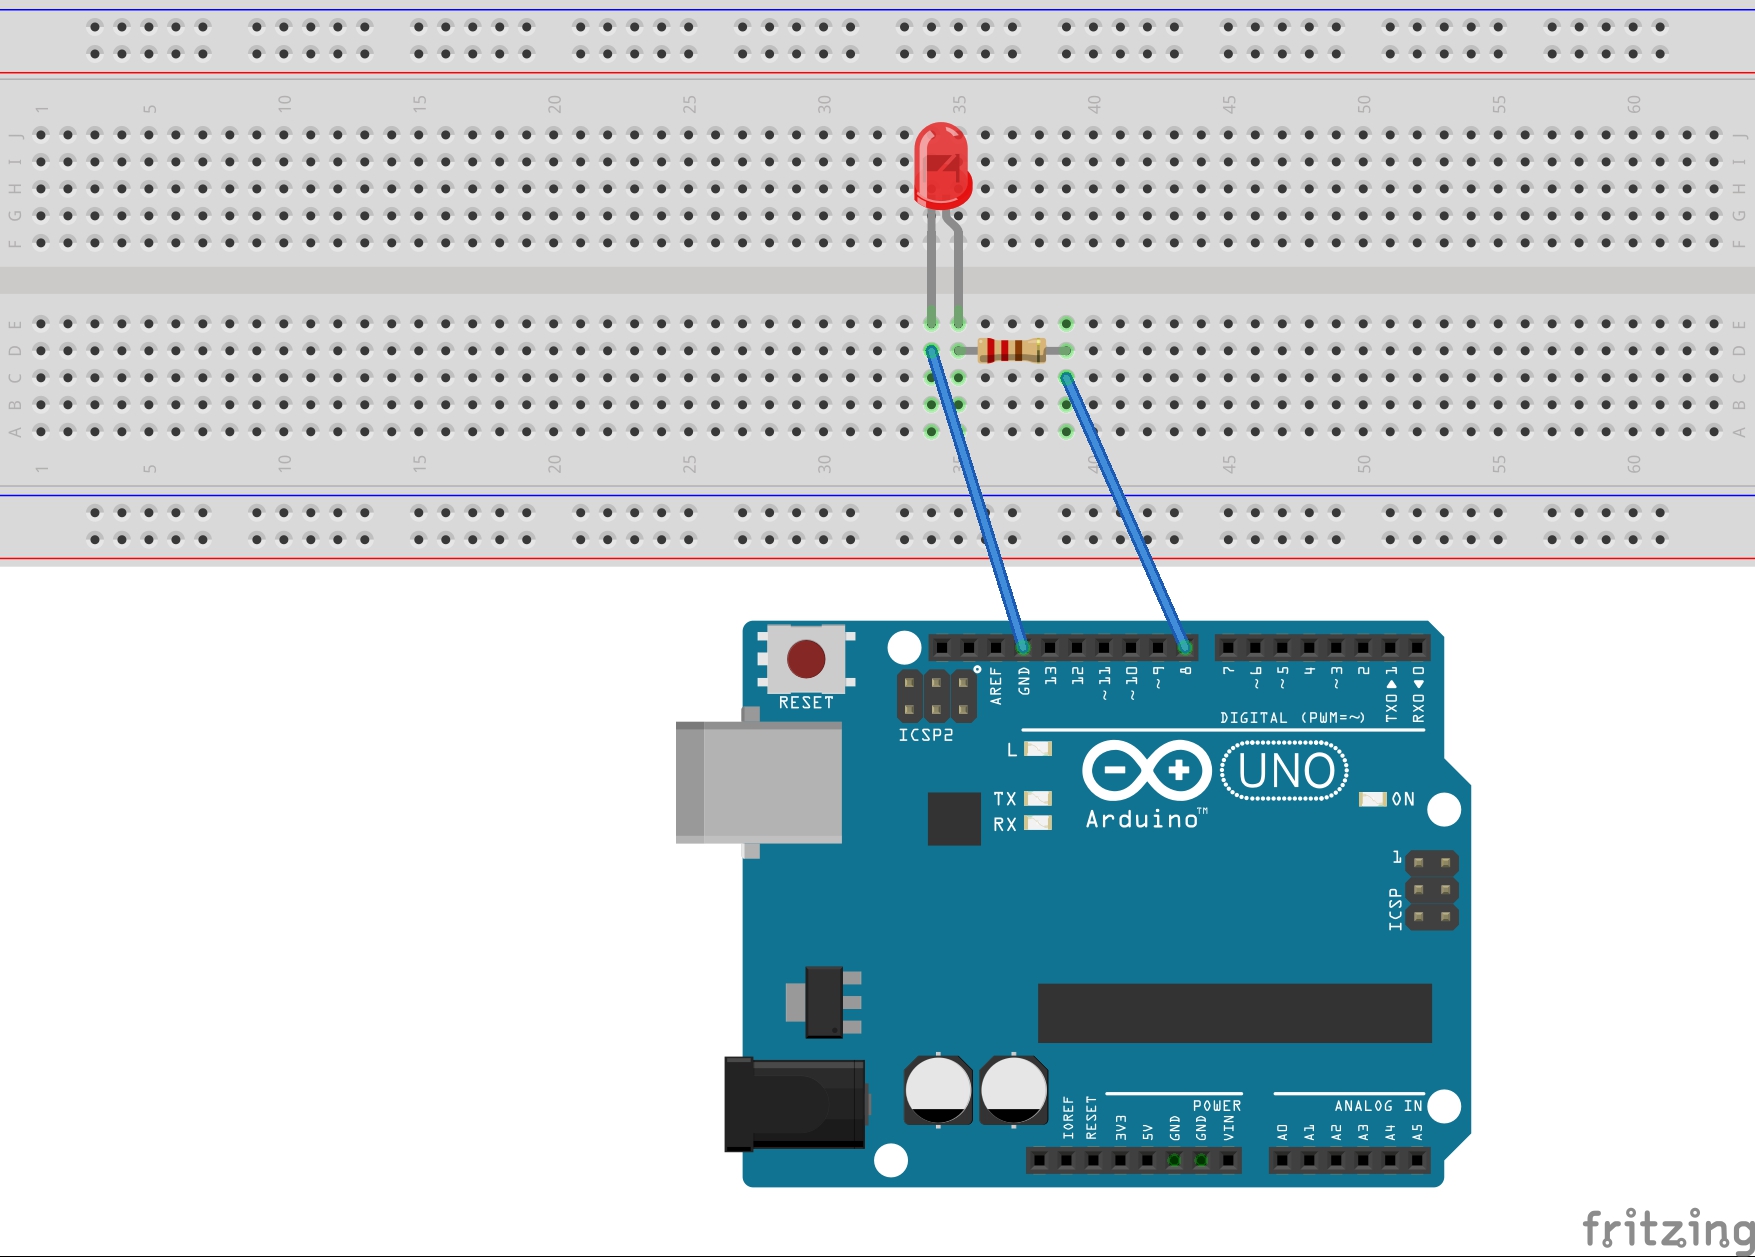
Belajar Arduino - Projek yang akan kita buat adalah menyalakan LED dan membuat LED berkedip (blink). Yang kamu perlu persiapkan adalah: 2x Kabel Jumper. BELI. Pin GND Arduino ke Breadboard. Pin negatif LED ke GND melalui resistor 220 ohm. pin positif LED ke pin 13 Arduino.

Tutorial Arduino Dasar nyalain lampu LED arduino dengan koding YouTube
This code is to blink built-in LEDs of NodeMCU. The on-board LED of ESP8266 is connected to GPIO2 and ths LED on NodeMCU board is connected to GPIO16. Working of this code is same as we explained earlier for external LED blinking with NodeMCU. int LED1 = 2; // Assign LED1 to pin GPIO2.

Tutorial Menjalankan Lampu Led Secara Bergilir Menggunakan Arduino Uno My XXX Hot Girl
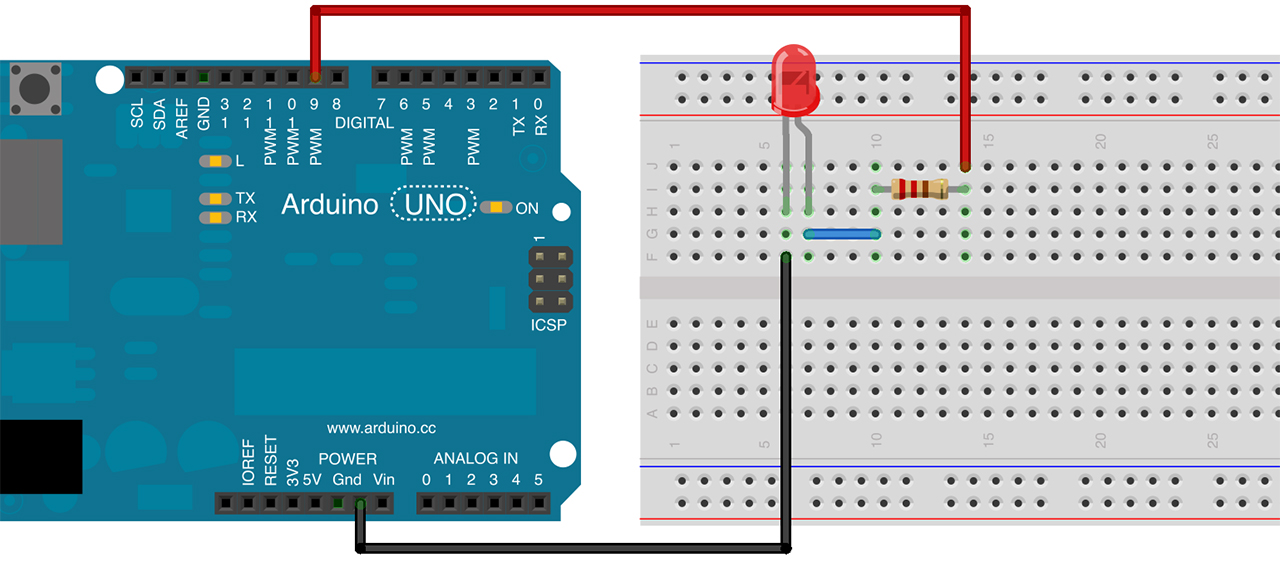
Program LED ON OFF. Output paling sederhana untuk Arduino adalah LED. Setiap LED menggunakan daya 2V sedangkan output digital Arduino adalah 5V karena itu saat memasang 1 LED pada output Arduino diperlukan resistor 220 atau 330 ohm agar tegangan yang diterima LED tidak berlebihan. Jika LED mendapat tegangan berlebih maka nyala akan sangat.